Wednesday, April 20, 2016

Giraffe Themed Newborn Set

I love customer orders. It is so much fun to work the the customer and create something unique! Sometimes the customer has a very specific request, other times it starts as just the beginning of an idea and I can take it and run with it. Remember guys, I am a professional... I know what I am doing (despite the huge mess this appears to be!).


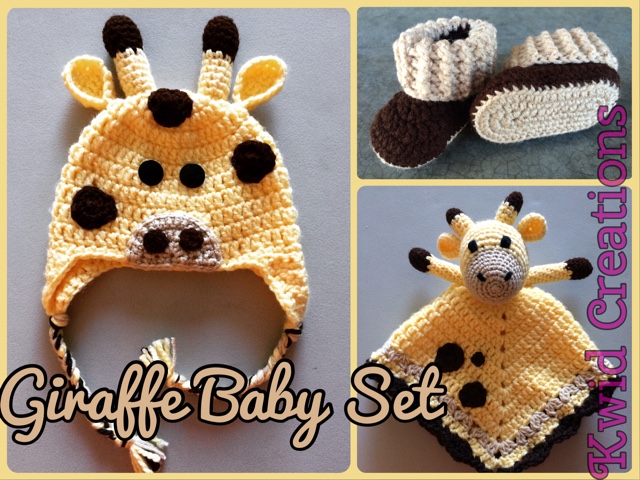
Back in February my friend approached me and requested that I make an afghan for her friend's baby due in April. Very excited at the opportunity to broaden my horizons, we threw around some ideas before she decided that she would like a giraffe themed gift set. I sent her some examples and got to work.

The first product, as posted on my social media pages, are these adorable little Ugg-style baby booties. I decided to make them larger than newborn so they were more versatile size-wise. With summer being right around the corner, I would hate to make a product that the baby could hardly wear! I used this pattern from Jinty Lyons. The pattern was a little finicky and I decided to change the hook size so I could get nice tight stitches. I measured and compared with size charts online to make sure I was on the right track. Although the booties are not specifically "giraffe" themed, I love the color combo and thought it complimented the other pieces well.


Second, this lovely little giraffe hat. I used this pattern from Repeat Crafter Me. It is one of many animal themed hats that are all adorable. I used an amazingly soft pastel yellow for the body that worked up nicely. This hat definitely required more work than I bargained! Lots of sewing and securing and weaving in ends.


But it was totally worth it because I cannot get over how cute it turned out. The back has just as much character as the front!

Lastly, this giraffe lovey is the best of both worlds! A blankie and a stuffed animal, loveys are really popular right now. I feel in some regions and cultures new families are overwhelmed with handmade blankets. So much love and time goes into making them, I think this smaller piece is a great alternative. The pattern is from LuLu's Crafts . Fantastic pattern and I just added a decorative row and scalloped border. I used the pattern for spots from the Repeat Crafter Me hat.


I love the way everything came together. Working on so many different pieces of varying sizes and colors and yarn types provided a fun challenge. I hope you enjoyed my post and let me know what you think in the comments below!


Wednesday, March 23, 2016

No Tears! Caking (without a swift!) {Free Tutorial}

Many months ago, tucked away on an end cap in the corner of Michaels, I found a great deal on yarn. It was Loops and Threads brand, which I love working with. This yarn looked even shinier and softer than the stuff I usually buy. Yes, I have yarn spidey sense!


One 40% off coupon later I was a proud owner of two large hanks of yarn, which I promptly threw into my stash and ignored for fear of winding.

Recently these bags of yarn went on clearance! Even with the limited colors, how could I resist? You're right, I can't, so I didn't... resist that is. There is plenty of buzz- good and bad- about this yarn on the multiple crochet Facebook pages. Everyone is coming to the consensus that they are a huge HUGE disaster to wind into a ball. Being the person I am...

Challenge ACCEPTED! 

I haven't yet invested in a yarn swift, and I'm too much of a wimp to sit there and hold it out, strung along my arms (what is this?! "arm day" at the gym?!). So I had to come up with another idea. I'm not a naturally patient person. But when it is something I am passionate about (like yarn and good deals), I find patience.

The first hank winding went just fine until- it didn't:
[Source]
Cue: patience. *deep breath* *dives back in*
[Source]
I ended up winding the other end into a ball til I got to the knot/ tangle. Then I continued to cake from there. Like so:


Semi-success is maybe more invigorating than complete success. Semi-success means you simply must try again. So I did... try again that is.

Here is a picture tutorial of my best method yet for successfully winding a hank without a yarn swift!

Step 1: Carefully untwist the hank


Step 2: Loop the hank over an ironing board. You want to make sure the ironing board is tall or wide enough so the yarn has space to hang without bunching on the floor. 


Step 3: Cut loose yarn that holds the hank together. In this instance the thread that holds the hank together IS NOT part of the hank itself. Just a few snips and unthread the piece. 


You can see in the picture below the difference between the hank yarn and the thread that holds it all together. The piece that holds it all together isn't wound tightly together but more like a few threads. 


Now you should have two distinct and clean ends of your hank with nothing holding it together, just a long yarn loop (pictured 3 photos back).

Step 4: Take one end and thread it through your yarn winder (or you can ball it if you would like). Read more about my yarn winder here.


PLEASE!: Make sure your set up is going to work for you! This is key to things running smoothly. My ironing board and table with yarn winder are just a few feet from each other.


Step 5: Start winding! -which is easier said than done. I made it a two-person job and it still took incredible patience, but overall less time than speeding through and running into problems.
Watch my video first, it is less than 20 seconds. 


You will be pulling the hank towards you to unravel it while someone cranks the yarn winder. 

This takes practice. And is a good moment to test relationships because you and your buddy over at the yarn winder have to get a good pace going to be successful. Marriage counseling may or may not be required before or after this process.

Tip #1: Make sure that you pull the hank/ yarn loop straight and even (photo left side). It will have a tendency to move towards your yarn winder. DO NOT let it separate and pull off the end of the ironing board (photo right side): 


Tip #2: When you pull make sure you grab the whole entire hank/ yarn loop. My nice long salad fingers came in handy! You will notice that even the "Yes" photo looks like a mess. Repeat after me: "It will all go fine if I take my time."


Again, you are pulling the hank toward you, making sure that the psycho at the yarn winder doesn't get too carried away. I made sure that the piece joining to the winder stayed under hand/ arm so it wasn't going too fast and getting ahead. 

Before too long you will have a beautiful, easy to use cake of yarn. You'll feel like:


It is easy to do while watching TV, listening to music, talking. So invite a friend over and put them to work! 

I have only done two hanks using this method but I am open to new suggestions and methods if you have them. Please comment below and let me know. Happy winding! 


Thursday, March 17, 2016

A Little Lucky Clover

Bored at recess in those hot late summer days, when it was too hot to play, I remember looking for 4-leaf clovers. I remember asking my mom and dad (separately of course, so I could compare answers) if 4-leaf clovers really existed. It was a matter of existence, not a question of finding one or if it would be lucky. Of the latter I was sure.


Now as a big kid, I make my own fortune, in yarn. This morning as I was scrolling through Instagram I saw Lion Brand feature this simple tutorial for a tiny {lucky, of course} 4-leaf clover.


They work up quick and I can already think of some uses for them:

Brooch (when you need green to avoid pinches!)
Headband
Bunting
Table decorations

Holidays like St. Patrick's Day always seem to sneak up on me, so I love little projects like this. What are your ideas? How can you see them being used?

Thanks again The Edible Complex for the fun pattern! Also A Creative Being for the heart pattern. I chose orange and white from Ireland's flag, of course. Knowledge of this compliments of elementary school and Flogging Molly merch.


Thursday, February 4, 2016

The Beginning- Sophie's Universe

January is always an exciting time of the year. Maybe not the beginning of the year. That is filled with too much longing for vacation and the holidays and family. But by the end of the month I've kicked my butt back into gear. I have some goals in place and a good idea of what I want to accomplish.

This year I have decided to set a goal to make an afghan! I have mentioned before that the largest project I've made to date was this massive Christmas Tree Skirt project, which was almost the size of an afghan. Taking on a full afghan is a significant project for me. Knowing this, I knew I needed an afghan that was more than the same stitch, same color, over and over again.

Enter: Sophie's Universe by Dedri Uys.
[Source]
This afghan is absolutely stunning. Jaw-dropping even. The pattern is designed as a Crochet Along (abbreviated as CAL). Which is just a fun way of saying that the pattern is released in parts, each composed of a few rounds (traditionally known as rounds). This was a 2015 CAL, so I had the advantage of being able to see all parts ahead of time and pick colors accordingly.

January 5th, 2016:


A perfect excuse to drag out all my yarn and try to visualize. Originally I was thinking it would be fun to focus on blues purples and reds. But I really loved the way Dedri started hers. Luckily I had similar colors in my stash. So I picked up my hook and did the most intimidating thing- I started!

January 22, 2016:
Round 13 finished. I love the shape with the red diamonds and blue triangles.


Even just adding one round, Round 14, dramatically changes the mandala.


You can already tell that this afghan features so many different stitches. It is a great way to push and challenge myself.

January 25th:
I am already learning so much. For example, Round 25, features the "crab stitch." Simple enough, but totally new to me. I love the way the orange frames the piece. 


February 4th:
My method so far is line up potential colors to try to visualize how it will look. This is one of my biggest challenges so far!


Look at all those little details. I love the red corner flowers!


February 7th: 
Just one more photo! Finished up through Round 36. Part 4 (out of 18!) complete. I can't wait to see where this journey takes me.


Sunday, January 17, 2016

Quilted Headboard {Free Tutorial}

A long time ago in the far far galaxy of my mind, I came up with this idea to make a headboard for my bed. Traditional headboards never seem to work well and I wanted something simple, lightweight, and pack-able since I seem to move about once a year.

I love my comforter just as much as when I first got it 4 years ago. Comforters for some reason or another are always an investment, so I figure this one isn't going anywhere soon. The one "issue" I have with it is that the predominant color is that off-white/ cream color. There isn't enough orange and brown and green and yellow. I am a person who needs her color, so I thought a headboard would be the perfect addition to bring color and decoration to my boring walls.

I found this semi-tutorial on Pinterest (which apparently and sadly is now a private blog). It seemed simple enough and my dad is the master craftsman so I knew he would be happy to help me out.


Honestly, he was just excited to have the excuse to possibly get a new tool. See above photo of him cruising the "Tool World" section of Lowe's. 

Back at home we made quick work of putting together a frame. We figured 64" x 35" would be good. My dad made sure that the top piece was a nice thick piece of oak and we even put flat planks on the front to square it up and provide a little more stability. Particularly for the front where there would be the most wear and tear (read: me thrashing and throwing pillows in the night). 


Gathering fabrics has been quite the process. I started with some some scraps and it slowly evolved and became more sophisticated. Here is one of the first renditions with my comforter below to try and match the colors. 


And yet another, with the more-portable pillow sham.


I finally started nailing down a pattern when Jen revolutionized my life with the suggestion to put some stripes horizontal.


It was a bold move. And one that paid off!

I am not a quilter. Heaven help us all I am not. I'm not even a sewer really. Most of this project was spent fighting with my machine because the bobbin tension was off. But I got it to work and eventually pieced together this beauty!

Once again: I have never pieced together a project like this! So I am really proud with the way it turned out.

After getting that all ironed out (literally). I went ahead an staple-gun-palooza'd the batting to the frame. Then oh so carefully started stapling the fabric piece on top. It might be possible that I have never not breathed for so long. I was just waiting for something to go wrong- but it looked great!


The big reveal of the finished product is the whole reason I create. I could feel a huge grin sweep over my face. I made that! I brain-engineered it! I love the feeling of satisfaction I get when I plan, execute, and finish projects.


Ta-da! New headboard!


If you have any questions about the project feel free to contact me! What colors would you pick for your headboard?

EDITED TO ADD: The headboard has been up for 3 months now and it holding up great! A big project but great "pay-off."


Sunday, December 27, 2015

Pip's Hat

I suppose I have been in a hat-making mood! I have lots of friends living in the Land of Frost and I think hats make a perfect handmade and practical gift for giving. My cute friend Pip hails from the land of Minnesota so she is no stranger to cold. She has a perfectly adorable style so I thought this cabled beanie from All About Ami would be perfect for her.


I went with a rather neutral gray. I wanted something that would match lots of her outfits without detracting from them. Buut I also know that gray is just way too much NOT Pip, so I jazzed it up with a multicolor pom pom in her favorite colors.


Oh wait...did someone say pom pom?! Oh! Better use that pom pom maker! *fist pump* 


I rather like the combination and balance between practical and fun in this hat. It was the perfect opportunity to practice cables, which I originally embarked on for the Zucchini Cable Scarf. Cables are definitely trendy right now, but also very classic.

The only modification I would consider for the pattern would be to maybe do the band a hook size down, just so it fits nice and snug. But it is a great pattern and All About Ami's patterns are all amazing. They are so easy and enjoyable to make. Look how cute she is hiking in Arches National Park!


Saturday, December 26, 2015

Pattern Review: ZiggyZag Vixen Slouch Hat

Let's face it- 12 Days of Star Wars was a bit of a flop. Just too many things going on. Every once in a while it is important to take a deep breath and lessen the stress. 12 Days of Star Wars had to go. But don't worry! I will bring it back. Maybe a build up for May 4th for Star Wars day?!

I feel like I am swimming in yarn. Somehow I always imagined it would be a much more enjoyable experience. I have Christmas presents to make and a massive scarf custom order (10+ scarves!) to finish. I am happy to report that the scarves are finished (read about it here). Now it's just finishing up Christmas gifts. But enough chatter, time for pictures and sharing!


I would like to introduce the ZiggyZag Vixen Slouch hat by designer Faith Holbrook. I originally snagged this pattern when she posted her rough draft version on a Facebook crochet page. I haven't yet bought the paid pattern but I imagine it could only be better than the original! I highly recommend it.

The first version I tried out was for a Christmas gift for my friend Kelli. I wanted to incorporate the colors from a pair of gloves and socks I got her as part of a sledding themed gift. I think it turned out pretty well!


It ended up being a little slouchier than I prefer, so subsequent versions I shortened a little. I removed a couple rows of v-stitch and a a row or so on the brim. These two were for my nieces who are pre-teen/ teen (holy crap when did that happen?!) so I didn't want them too large.

This was also the perfect excuse to get the smaller pom pom makers since I'm not sure how "cool" big fluffy pom poms are these days.


This hat is really fun to make! It's simple and you don't have to worry about constantly counting stitches, so it works up fast. Which is exactly why I decided to make one for myself. All this snow has me in the mood for sledding. A bright and festive hat is a must!


What do you think? Which color combo is your favorite or what color combo would you like to see? I hope you are enjoying the holidays and staying warm (at least for me!)