Thursday, August 11, 2016

Sophie's Universe Finishing Up!

Remember the Sophie's Universe afghan I have been working on? You probably do because I have been posting about it more frequently. You can read about the beginning here. And the half-way point here. Since unpacking "her" after the move, I have really picked up steam. I've had fun working on it even though now each round takes more and more time. Some nights I only get one round done. And that's after working the whole night. But I am learning so much each round and really honing my skills.

August 9th: 
Finished up to Round 111. I've come along way since even the half-way point (read about it here).  


Saying goodbye to Sophie has been hard. I just can't resist adding more details. Recently on social media my followers helped me choose the colors for the very last rounds- green and fushia! My followers have great taste.

August 10th:


After finishing the afghan I added some surface details. This pink round really adds textures and makes the Butterfly Band "pop."

 August 11th: 


I also added light pink flowers in the corners by the red flowers. They are subtle enough, but really add to the feel of the afghan. Below you can see the before and after pictures. You can also see how different it looks in full natural sunlight (right picture). 


Next I need to weave in all these ends. That may be the scariest part so far. I have actually been on top of weaving in the ends for the most part, so it shouldn't be too much work. This collage just looks extremely scary. But I have it all under control.


I am so close to finishing now! The very last detail is to "block" the piece. I will talk more about that in my next post. I tried to avoid the need for blocking but it has become apparent that all that bulging and pouching will benefit (read: go away) with some blocking. 

Here is your best sneak peek for now:


Friday, August 5, 2016

Monsoon Day Beanie

Summers in Phoenix are .... toasty.

It puts me in quite the conundrum because so many crochets items are thought of as traditionally Autumn and Winter. Any summer day I will challenge that! Starting with my Pokemon Squirtle project I completed recently.

Buuut, truly deep in my heart I long for cool breezes and crunchy leaves. Lucky for me- Arizona monsoon season is in full effect.Storms blow through so quickly. Barely enough time to, say, whip up a child's beanie! But that did stop me from trying today!


Hello you beautiful 70 degrees. Stay a while won't you?


For this child's beanie I used Whistle & Ivy's Puppy Love pattern. I love this little heart stitch! I wanted an ombre effect so I used pink, variegated, and white yarn.

As if kiddos in beanies isn't hip enough, I made an oversized pom pom for the top.


Thank you pom pom maker!


Boom!


This hat will be up for sale in my Etsy shop. Check it out! 

I was also thinking of doing a sort of "mommy & me" set and adding an adult sized hat. What do you think?


Friday, July 15, 2016

WIP: Sophie's Universe Half-way There!

In the words of an 80's hair band, "Whoooaaaahh! We're half way thereeeee!"

And I have to admit that on some rounds I have felt like I was "living on a prayer" (crocheting on a prayer?!). Thanks for the inspiration Bon Jovi. I need it as I wrangle these 17 different colors.


A "WIP" is an acronym for "Work In Progress." Exactly what Sophie's Universe is right now. You can see my first post about this project here. With 113 scheduled rounds of this "Crochet Along," round 57 is about the middle. Well, I've really been jamming and I just kept going! Below I've finished up to Round 68.

 June 19th: 


Above, you can see a picture of the "blocking" process. It's a process used to accomplish stretching and molding to make your product a desired shape. There are a few ways to do this. I don't quite have all the tools I need to do a hardcore blocking, but I made do! You may notice that instead of pins and a foam mat- I've used a blanket and canned food. It worked pretty well! The photo was a little dark because I took it in my Craft Cave (still on the quest to find a decent lamp since the room doesn't get much natural light).

I wanted to document all the colors I used. I photographed them in natural light so you can see how beautiful the colors are! Still, the picture doesn't do them justice.


My Color Guide ~Sophie's Universe~
#1 Red Heart with Love- Holly Berry (Joanns)
#2 Craft Smart- Fuchsia (Michaels)
#3 Crafter's Secret- Passion (Hobby Lobby)
#4 Loops and Threads Impeccable- Lippy (Michaels)
#5 I Love This Yarn- Pink (Hobby Lobby)
#6 Red Heart Soft- Tangerine (Michaels) 
#7 Deborah Norville- Bittersweet (Joanns)
#8 Caron Simply Soft -Lemon Drop? (Michaels)
#9 Hobby Lobby- I Love This Yarn- Buttercup 
#10 Red Heart Soft- Guacamole (Michaels) 
#11 (Don't remember!)
#12 Red Heart With Love- Peacock (Joanns) 
#13 Vanna's Choice- Colonial Blue (Michaels) 
#14 Deborah Norville- Royal Blue (Joanns)
#15 Red Heart Soft- Turquoise (Michaels) 
#16 Loops and Threads Impeccable- Lavender (Michaels) 
#17 Red Heart Soft- Grape (Michaels)

After blocking and re-stocking my pantry with all those cans, I got back to work. Below you can see the beautiful details of the roses from Round 59. That has been my favorite round so far. Below the afghan is finished up to that bright orange Round 74.

July 14th: 


I think I should name this afghan the "Wild Card" afghan. Visually it is so enticing and dynamic. It starts with a circle then morphs into a square, then an octagon- and we are only to Round 76!


Round 76 features these adorable light pink scallops, which won't stay scallops for long.


But that is all the teasing I will do for now. Back to work!


Wednesday, May 4, 2016

12DoST #6: Rathtar Oreo Truffles

Happy Star Wars Day! And May the 4th be with you!
Picture
[Source]
I have a history of Star Wars themed posts on this blog. You might think I only make scarves and Star Wars crafts! That isn't entirely true, but I do love them both (whoa methinks a Star Wars themed scarf?!)


As I was brainstorming a post for May 4th, my brain was so full of half-baked and phony Pinterest pins I couldn't come up with anything original. Well, I turned to my creative, Star Wars fanboy. He delivered. And now I can present to you:

Rathtar Oreo Truffles!*
[Source]
* Much tastier than this guy looks!

You will need: 
1 package Red Velvet Oreos
1 8oz package of cream cheese -softened- ("Neufchatel Cheese" pictured below)
---------
Red Vines
Mini Oreos
M&Ms (any kind that have orange, may need multiple packs!)
Chocolate chips or any kind of melting chocolate


Instructions: 

To make the Oreo truffles: 
1. Crush the oreos in a blender, bag, or food processor. Depending on the sweetness level, you may remove the cream filling if desired. Since the cream cheese flavored filling on these Oreos is an integral part of flavor (and I have a sweet tooth!) I left it in. 

2. Cut up the softened cream cheese a little and mix into the cookie crumbs. 

3. Roll into balls and put in the fridge/ freezer to firm up so they are easier to decorate.


To prepare decorations:
4. While the truffles are cooling get your decorations ready. I cut the vines in half long-wise, then again short-wise (is that a word?). They were still plenty long to serve as gangly Rathtar legs. 

5. Separate out your orange M&Ms. I found crispy M&Ms on clearance at the local dollar store. Score! But there were only about 4 oranges in each package. Plan accordingly. 

6. Separate your mini Oreos and use a small knife or toothpick to give it deathly sharp teeth. 
TIP: Cool the Oreos for a bit so it is easier to work with the creme filling! 

7. Melt your chocolate right before taking the truffles out of the fridge so it is nice and liquid for decorating. This will be the "glue" to hold the decorations in place. 
TIP: I use a little bit of shortening when I melt my chocolate chips. 


Get to decorating! (I hope you find the picture tutorial below helpful):

8. Place a dot of melted chocolate for the Oreo "mouth" and stick on the prepared mini Oreo/ jaws of death. 

9. Using a bamboo skewer or similar instrument, poke holes in the body for all the legs. Dip the Red Vine legs into the melted chocolate and place inside the hole you made in the body. 

10. Lastly, those horrible eyes!! By now you know the drill- dollops of melted chocolate, then your M&Ms on top. 

Eat right away or refrigerate before serving.


There you have it! Your very own creepy and tasty Rathtar Oreo Truffle. Make sure to make a whole pack of them because as we will never forget the Trillia Massacre, they hunt in packs. 


Happy May the 4th! Post your creations below or #kwidcreations on Instagram! 


Wednesday, April 20, 2016

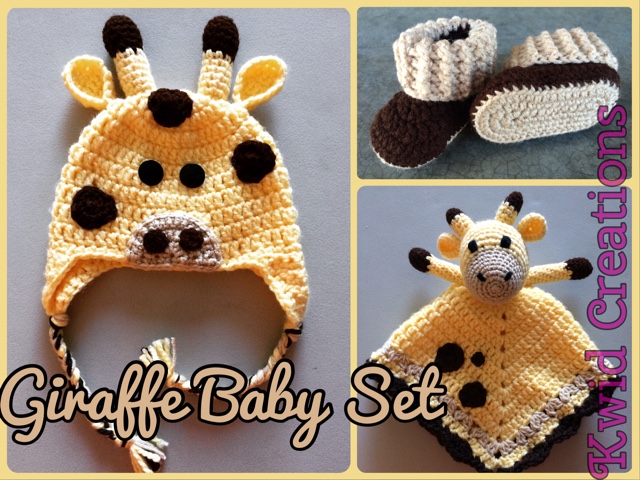
Giraffe Themed Newborn Set

I love customer orders. It is so much fun to work the the customer and create something unique! Sometimes the customer has a very specific request, other times it starts as just the beginning of an idea and I can take it and run with it. Remember guys, I am a professional... I know what I am doing (despite the huge mess this appears to be!).


Back in February my friend approached me and requested that I make an afghan for her friend's baby due in April. Very excited at the opportunity to broaden my horizons, we threw around some ideas before she decided that she would like a giraffe themed gift set. I sent her some examples and got to work.

The first product, as posted on my social media pages, are these adorable little Ugg-style baby booties. I decided to make them larger than newborn so they were more versatile size-wise. With summer being right around the corner, I would hate to make a product that the baby could hardly wear! I used this pattern from Jinty Lyons. The pattern was a little finicky and I decided to change the hook size so I could get nice tight stitches. I measured and compared with size charts online to make sure I was on the right track. Although the booties are not specifically "giraffe" themed, I love the color combo and thought it complimented the other pieces well.


Second, this lovely little giraffe hat. I used this pattern from Repeat Crafter Me. It is one of many animal themed hats that are all adorable. I used an amazingly soft pastel yellow for the body that worked up nicely. This hat definitely required more work than I bargained! Lots of sewing and securing and weaving in ends.


But it was totally worth it because I cannot get over how cute it turned out. The back has just as much character as the front!

Lastly, this giraffe lovey is the best of both worlds! A blankie and a stuffed animal, loveys are really popular right now. I feel in some regions and cultures new families are overwhelmed with handmade blankets. So much love and time goes into making them, I think this smaller piece is a great alternative. The pattern is from LuLu's Crafts . Fantastic pattern and I just added a decorative row and scalloped border. I used the pattern for spots from the Repeat Crafter Me hat.


I love the way everything came together. Working on so many different pieces of varying sizes and colors and yarn types provided a fun challenge. I hope you enjoyed my post and let me know what you think in the comments below!


Wednesday, March 23, 2016

No Tears! Caking (without a swift!) {Free Tutorial}

Many months ago, tucked away on an end cap in the corner of Michaels, I found a great deal on yarn. It was Loops and Threads brand, which I love working with. This yarn looked even shinier and softer than the stuff I usually buy. Yes, I have yarn spidey sense!


One 40% off coupon later I was a proud owner of two large hanks of yarn, which I promptly threw into my stash and ignored for fear of winding.

Recently these bags of yarn went on clearance! Even with the limited colors, how could I resist? You're right, I can't, so I didn't... resist that is. There is plenty of buzz- good and bad- about this yarn on the multiple crochet Facebook pages. Everyone is coming to the consensus that they are a huge HUGE disaster to wind into a ball. Being the person I am...

Challenge ACCEPTED! 

I haven't yet invested in a yarn swift, and I'm too much of a wimp to sit there and hold it out, strung along my arms (what is this?! "arm day" at the gym?!). So I had to come up with another idea. I'm not a naturally patient person. But when it is something I am passionate about (like yarn and good deals), I find patience.

The first hank winding went just fine until- it didn't:
[Source]
Cue: patience. *deep breath* *dives back in*
[Source]
I ended up winding the other end into a ball til I got to the knot/ tangle. Then I continued to cake from there. Like so:


Semi-success is maybe more invigorating than complete success. Semi-success means you simply must try again. So I did... try again that is.

Here is a picture tutorial of my best method yet for successfully winding a hank without a yarn swift!

Step 1: Carefully untwist the hank


Step 2: Loop the hank over an ironing board. You want to make sure the ironing board is tall or wide enough so the yarn has space to hang without bunching on the floor. 


Step 3: Cut loose yarn that holds the hank together. In this instance the thread that holds the hank together IS NOT part of the hank itself. Just a few snips and unthread the piece. 


You can see in the picture below the difference between the hank yarn and the thread that holds it all together. The piece that holds it all together isn't wound tightly together but more like a few threads. 


Now you should have two distinct and clean ends of your hank with nothing holding it together, just a long yarn loop (pictured 3 photos back).

Step 4: Take one end and thread it through your yarn winder (or you can ball it if you would like). Read more about my yarn winder here.


PLEASE!: Make sure your set up is going to work for you! This is key to things running smoothly. My ironing board and table with yarn winder are just a few feet from each other.


Step 5: Start winding! -which is easier said than done. I made it a two-person job and it still took incredible patience, but overall less time than speeding through and running into problems.
Watch my video first, it is less than 20 seconds. 


You will be pulling the hank towards you to unravel it while someone cranks the yarn winder. 

This takes practice. And is a good moment to test relationships because you and your buddy over at the yarn winder have to get a good pace going to be successful. Marriage counseling may or may not be required before or after this process.

Tip #1: Make sure that you pull the hank/ yarn loop straight and even (photo left side). It will have a tendency to move towards your yarn winder. DO NOT let it separate and pull off the end of the ironing board (photo right side): 


Tip #2: When you pull make sure you grab the whole entire hank/ yarn loop. My nice long salad fingers came in handy! You will notice that even the "Yes" photo looks like a mess. Repeat after me: "It will all go fine if I take my time."


Again, you are pulling the hank toward you, making sure that the psycho at the yarn winder doesn't get too carried away. I made sure that the piece joining to the winder stayed under hand/ arm so it wasn't going too fast and getting ahead. 

Before too long you will have a beautiful, easy to use cake of yarn. You'll feel like:


It is easy to do while watching TV, listening to music, talking. So invite a friend over and put them to work! 

I have only done two hanks using this method but I am open to new suggestions and methods if you have them. Please comment below and let me know. Happy winding! 


Thursday, March 17, 2016

A Little Lucky Clover

Bored at recess in those hot late summer days, when it was too hot to play, I remember looking for 4-leaf clovers. I remember asking my mom and dad (separately of course, so I could compare answers) if 4-leaf clovers really existed. It was a matter of existence, not a question of finding one or if it would be lucky. Of the latter I was sure.


Now as a big kid, I make my own fortune, in yarn. This morning as I was scrolling through Instagram I saw Lion Brand feature this simple tutorial for a tiny {lucky, of course} 4-leaf clover.


They work up quick and I can already think of some uses for them:

Brooch (when you need green to avoid pinches!)
Headband
Bunting
Table decorations

Holidays like St. Patrick's Day always seem to sneak up on me, so I love little projects like this. What are your ideas? How can you see them being used?

Thanks again The Edible Complex for the fun pattern! Also A Creative Being for the heart pattern. I chose orange and white from Ireland's flag, of course. Knowledge of this compliments of elementary school and Flogging Molly merch.